Benefits of strength training
Strength is the ability to produce a force. Strength training consists of resistance exercises1, which increase one’s muscle strength, muscle size, speed and power.
These are some major benefits of strength training –
(i) It benefits individuals of all age.
(ii) It increases muscle strength, muscle endurance and muscle power.
(iii) Increased muscle mass causes increased resting metabolic rate (RMR) and consequent increased total daily energy expenditure. This helps in weight management.
(iv) It slows down the process of sarcopenia (loss of muscle mass in older adults) by increasing muscle mass.
(v) It strengthens our bones by loading them and thereby increasing bone density. The risk of bone fracture by falling in old age is thus reduced.
(vi) It helps us carry out our day-to-day work easily.
(vii) It improves stability, balance, posture and boosts up our self-confidence.
1. Resistance against weights, own body weight or machines
II. STRENGTH TRAINING EXERCISE TECHNIQUES
Remember the following basics of strength training techniques –
(i) Assume correct body form and maintain it throughout the exercise.
(ii) Know about the muscles to be targeted and focus on them while exercising.
(iii) Proper breathing is very important during exercise. Here, the simple rule is this – Breathe out during the hardest part of the exercise and breathe in during the easier part of the exercise. For example, during bench press, breathe out while lifting the weight and breathe in while lowering the weight. But at no point, you should forcibly hold your breath. Holding breath can induce excessive increase in blood pressure. Dizziness, sudden loss of strength would be warning signs. In such a situation, immediately stop exercise.
(iv) Use weightlifting belts in case of lifting maximal or near-maximal weight while doing structural exercises. Structural exercises are those exercises which load your trunk and place stress on the lower back (e.g., squat, standing shoulder press, dead lift, etc.). However, use of weightlifting belt for even lighter weights may cause under-exercise and related under-strengthening of muscles of lower back and abdomen. Such weaker torso-muscles may get injured, in case a heavier weight is lifted without weightlifting belts.
Back to top >
Medical disclaimer - The website content is provided for general educational purpose only. It does not substitute professional medical advice. Reader is advised to consult his doctor before starting any fitness program to avoid any health risks.
III. STRENGTH TRAINING PROGRAMME DESIGN
A strength training programme should be guided primarily by one’s training goal. Broadly, training goals may fall into one of these categories – (i) muscular strength (ii) muscular endurance (iii) hypertrophy (increased muscle size). A common man or woman may be happy with just overall fitness. Athletes and sportspersons will do it for improving their sports performance. Professionals like members of police or army may find it useful to achieve prescribed physical fitness standards set for them.
Like any other exercise programme, strength training also should take into account the following principles of exercise/FITT factors –
A. Specificity – Identify your training goals. Identify the muscles that come into play in your specific game, sports or job. Select specific exercises that target those relevant muscle groups. Beginners should select exercises to workout their all important large and small muscles for overall conditioning, viz., chest, shoulders, upper back, lower back, thighs, calves, abdomen, biceps and triceps. Afterwards, they can select specific exercises as per their goal.
B. Frequency – When we say that strength training should be done 3-5 times a week, we mean that the strength training of the same muscle group has to be done 3-5 times a week. There should be a recovery gap of 48-72 hours (not less than one day and more than two days) between two sessions.
A beginner can have two sessions in a week (e.g., Monday and Thursday) or three sessions (e.g., Monday, Wednesday and Friday). Advanced trainees can have workouts on three days. A split routine allows them four or more sessions also. However, it is important to avoid workout of the same muscle groups on two days in a row. Workouts may be planned thus – Upper body on Monday and Thursday; lower body on Tuesday and Friday. There may be several other combinations depending upon your time constraints.
C. Progression – Once you overload your system, your muscles would adapt to it by increasing their strength. If you continue your training with the same load, (i.e., same number of repetitions /sets with same weight), you will not gain further. Therefore, go on increasing your training load to reach your full training potential.
How do you know that it is time to increase the load? 2-for-2-rule may help you in this regard. According to this rule, if you can complete 02 more repetitions than the repetition goal in the final set of an exercise for 02 consecutive training sessions, the load in all sets of that exercise should be increased in the next training session. For example, if your repetition goal is 10 in an exercise and you can complete 2 more repetitions (i.e., 12 repetitions) in the final set in two consecutive training sessions, it is time to increase load during the next training session.
The next question comes – how much weight should you increase? The answer is, increase the weight with which you can perform minimum number of required repetitions of your target range. For example, if your target range of repetitions is 8-10 per set, you should be able to perform minimum 8 repetitions with the increased weight.
D. Overload – Overloading in strength training can be done by
(i) increasing weight/resistance, (ii) increasing total number repetitions/sets, (iii) reducing recovery time between two sets, (iv) reducing repetition velocity by slowing down muscle movement. (For example, while doing bench press, take 8 seconds (instead of usual 4 seconds) to lower down the weight.)
It is important to perform all repetitions while strictly maintaining correct form and technique. Secondly, required number of repetitions should be done till total muscle failure. Total muscle failure occurs when one cannot do another correct repetition anymore. Never distort your body and compromise with the correct form just to perform one or two additional repetitions. You will gain nothing but injury by doing so.
The number of repetitions and sets depends upon your primary training goal. Beginners may benefit even with one set (during initial 3-4 weeks). However, you will have to perform 2-6 sets to reach your full potential. Select a weight that allows you to do prescribed range of repetitions. The following guidelines will be useful in this regard –
| Training Goal | Repetitions | Sets |
|---|---|---|
| Muscular endurance | ≥ 12 | 2-3 |
| Hypertrophy (increased muscle size as in body building) | 6-12 | 3-6 |
| Muscular strength | ≤ 6 | 2-6 |
It is important to perform the same number of repetitions in each set. It may happen that the fatigue caused by the earlier set may not allow you to perform the same number of repetitions in the subsequent set. Then you have two options to reach your repetitions goal – (i) take assistance of your partner (spotter), or, (ii) drop some load and perform the target number of repetitions.
E. Recovery - Duration of recovery period between two sets is an important factor in strength training. For endurance, sets (with light weight) are performed in quick succession allowing little rest between two sets. For strength, sets (with heavy weight) are performed allowing full rest between two sets. General guidelines in this regard are given in the following table –
| Training Goal | Repetitions |
|---|---|
| Muscular endurance | ≤ 30 seconds |
| Hypertrophy (body building) | 30-90 seconds |
| Muscular strength | 2-5 minutes |
With experience you will learn about the optimal rest period for you. Full rest means when your rate of breathing becomes normal.
F. Variation – Performance of the same set of exercises for a long time may result into overtraining or undertraining of particular muscle groups and boredom of the trainee – all resulting into a decline in performance. The remedy is to introduce variation in exercises. For example, different training days may be marked as heavy, medium, light training day when the load would be heavy, medium and light respectively, though number of repetitions may be the same.
G. Balance – While principle of specificity in strength training is important, equally important is the element of balance. Never ignore any muscle group completely, even though you may like to focus on specific muscle group, train the whole body. There should be a balance between upper body and lower body. To ensure a balanced workout, do at least one set of exercise for each of the major muscle group.
Important – A strong lower back adds considerably to our overall strength and protects us against lower back injuries, yet sometimes it is the most neglected area. Never ignore your lower back. In our day to day life, lower back injuries are one of the most common injuries. They occur due to (a) weak lower back and abdominal muscles and (b) wrong form and technique of lifting weight. I will go to the extent to recommend that, if you have only 5-10 minutes to spare for exercise, exercise your lower back and abdominal muscles only. Strong lower back and abdominal muscles are great support for the spine. In absence of strong supporting muscles the spine will have to bear the maximum load by itself and therefore would be susceptible to injury.
Back to top >
Medical disclaimer - The website content is provided for general educational purpose only. It does not substitute professional medical advice. Reader is advised to consult his doctor before starting any fitness program to avoid any health risks.
IV. SEQUENCE OF EXERCISE
Follow these guidelines –
(i) The most important point is that exercises should be ordered in such a manner that fatigue caused by the previous exercise either (a) does not affect or (b) affects your strength for subsequent exercise the least. One way to ensure this is to alternate e.g., upper body exercise followed by lower body exercise, again upper body exercise, and so on. This sequence gives the exercised muscle enough time to recover between two sets. The sample circuit training given in Appendix-I is based on this principle.
(ii) Start with core exercises2 and then proceed to assistance exercises3 . In other words, larger muscle groups should be addressed first followed by smaller muscles.
Back to top >
Medical disclaimer - The website content is provided for general educational purpose only. It does not substitute professional medical advice. Reader is advised to consult his doctor before starting any fitness program to avoid any health risks.
V. SAFETY FACTORS
Strength training is thoroughly enjoyable and safe. Injuries happen mostly because of neglect of certain basic safety rules. Make sure you follow these safety rules –
(i) Warm up well before starting the training.
(ii) Focus you mind especially while lifting heavy weights.
(iii) Always use proper form and technique.
(iv) Avoid ‘too much too soon’ approach.
(v) Have a spotter (partner) especially during lifting of heavy free weights.
(vi) Never hold your breath while lifting weights.
(vii) Obey the discipline of gym. Don’t leave weights, bars, etc. unattended on floor.
2. Core exercise involves two/more primary joints and one/more large muscle groups, e.g., bench press, squats.
3. Assistance exercise involves only one primary joint and smaller muscle group, e.g., biceps curls.
VI. FREE HAND EXERCISES
Here is a list of free hand exercises with full description of their technique, variations, etc. The same set of exercises can be used for both muscular strength training as well as muscular endurance training. You can use them for strength training in these ways –.
(i) Slow down the movement, e.g., take 6-8 seconds to lower down instead of usual 2 seconds while performing push-us, squats, chin-ups, etc.
(ii) Pause at the peak of each repetition for 2 seconds.
(iii) Ask your partner to increase the load by applying pressure on you throughout the movement. The load should be such as to allow you maximum 3-6 repetitions in a set. Follow the overload principle mentioned under Strength Training Programme Design.
(iv) Adopt more difficult variations.
(v) Take sufficient recovery time in between.
Familiarity with major muscles of human body will help you to be more systematic and focused. (fig-1)
Major Skeletal Muscles of Human Body

1. Push-ups
Areas worked – Pectorals, deltoids, upper back, triceps and abdominals.
Technique
Assume the position as in fig-2. Feet 10-12 inches apart. Hands 4-5 inches wider than shoulder width. Body straight. Stomach pulled in.
Lower your body slowly till your chest touches the ground (Peak) (fig-3).
Push your body up to the original position (fig-2). (This is 01 repetition).
Do required number of repetitions.
Keep your body straight throughout the movement.
Don’ts
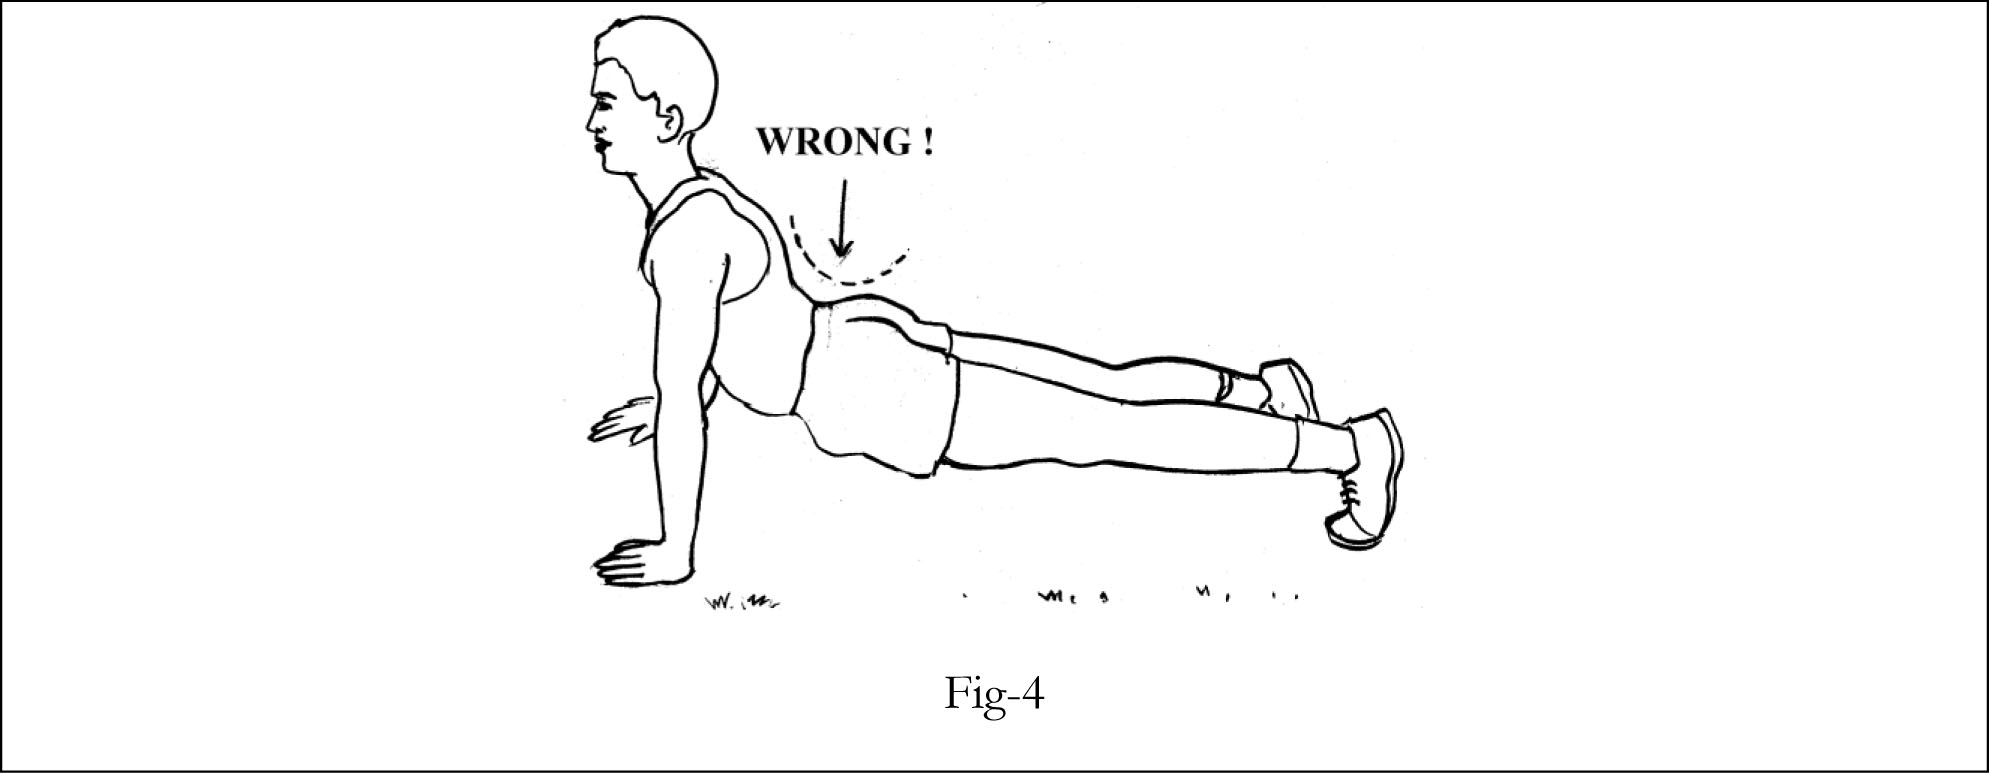
Don’t arch your lower back. This may unduly stress your lower back. (fig-4).
Don’t let your body ‘fall’. Lower your body in a slow, controlled way.
Don’t hold your breath at any point of time.
Hints and Tips
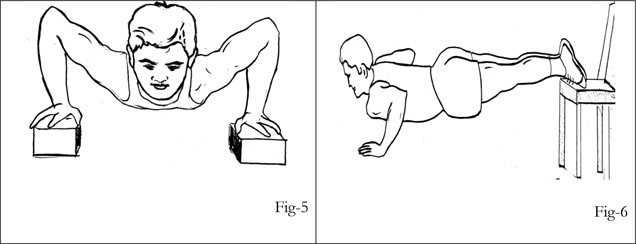
Use bricks to rest your hands for greater range of movement of your muscles(fig-5).
Place your feet on a chair or bed to work out your upper chest (fig-6). Gradually you can increase the elevation and finally do push ups with legs supported against a wall. Take care not to get dizzy.
Increase the width of hands for wider push-ups (fig-7).
Perform push-ups with your hands closed together or 2-3 inches apart. This is an excellent exercise for triceps.
Tell your partner to apply pressure on your upper back to increase load throughout the movement.
Variation
(a) Power push ups are more difficult variation of push ups.
Technique
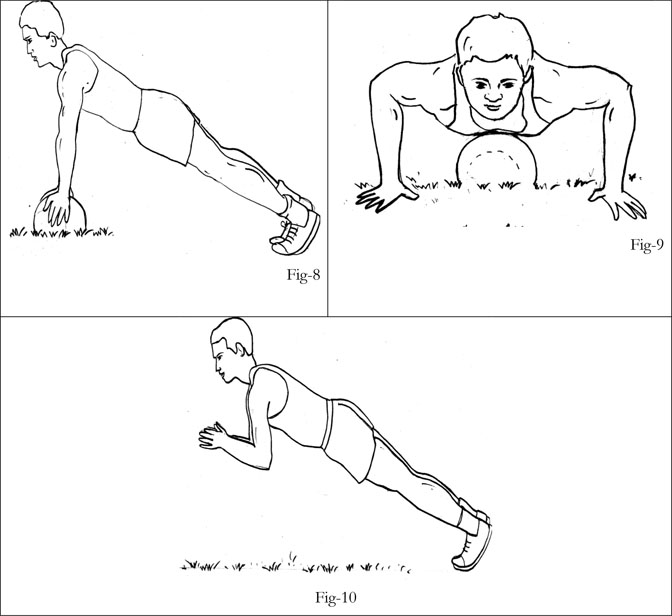
Rest your hands on a medicine ball (fig-8). (Place the ball in a shallow pit for stability).
Move your hands off the ball and quickly place them on ground at shoulder width, simultaneously lowering down the body till your chest almost touches the ball (fig-9).
Push your body back to the original position (fig-8). (This is 01 repetition).
Do required number of repetitions.
Keep your body straight throughout the movement.
Alternatively, acquire the standard push-ups position as in fig-2. Push your body up, clap in the air (fig-10) and again come back to the original position (fig-2).
Keep your body straight throughout the movement.
(b) Shallow dive push-ups are another variation of push-ups, which are very popular among traditional wrestlers. I have found that this variation of push-ups addresses more muscle groups of upper body than the standard push-ups.
Technique
Acquire the position (fig-11).
Lower down your body, move forward and up as if you are diving into and emerging from water (fig-12, 13).
Come back to the original position (fig-11).
Take care not to make any jerky movement. There should be no stress on lower back at all.

2. SQUATS
Areas worked: legs and hips (Quadriceps, hamstrings, gluteals and calves)
Technique
Stand on your feet shoulder width apart.
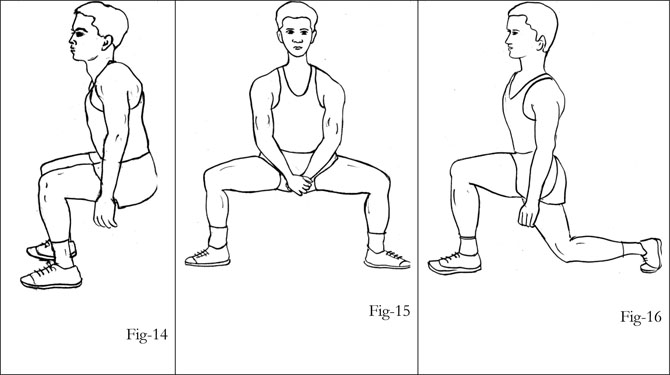
Keeping your back straight slowly sit down on an imaginary chair till your thighs are parallel to the ground (Peak) (fig-14).
Stand up to the original position. (This is 01 repetition)
Do required number of repetitions.
Don’ts
Don’t round your back. Keep your back straight throughout the movement.
Don’t tilt your knees forward. It puts too much stress on knees and also robs target muscles of the main benefits of squats. A perpendicular line drawn from the knees should not fall out of the toes.
Hints and Tips
You can hold a fixed object, e.g., window bar to maintain your balance during squats.
Fold your hands overhead for greater difficulty.
Occasionally, you can do squats while standing on your toes throughout. This exercise mainly strengthens quadriceps close to knees and partly calves. This also improves your overall balance.
Variation
(a) Do Wide Feet squats for strengthening hip adductors and gluteals (fig-15). It resembles horse riding stance. Keep your back straight. Toes pointing out sideward. Knees bent at 90. Hands in front. You can hold weight for greater benefits. Keep your back straight throughout the movement.
(b) Lunges
Technique
Stand on your feet shoulder width apart.
Take left leg forward and lower down bending left knee at 90°. Knee of right leg would be just above the ground (fig-16).
Come back to the original position and take right leg forward. Do lunges with alternative legs. (This is 01 repetition)
Do required number of repetitions.
Keep your back straight throughout the movement.
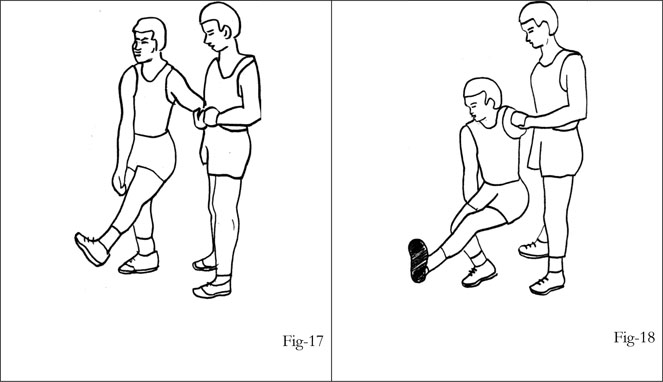
(c) Single leg squat
This can be done with help of a partner or by holding a fix object (fig-17, 18). Again, keep your back straight throughout the movement.
3. UPPER ABDOMINAL CRUNCHES
Areas worked – upper abdominals
Technique
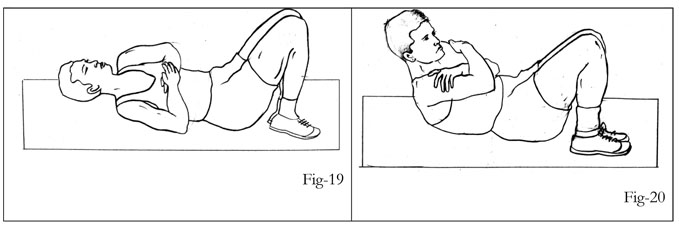
Lie on your back. Fold your legs so that your feet are close to your hips. Hands folded across your chest (fig-19).
Curl your torso 5-6 inches above the ground (Peak) (fig-20).
Slowly come back to the original position (fig-19). (This is one repletion)
Do required number of repetitions.
Don’ts
Don’t flatten your legs on the ground. That would put undue stress on your lower back.
Don’t do jerky movements. All movements should be rhythmic and smooth.
Hints and Tips
Hold weight plates on your chest to increase the load.
You can place your legs on a chair or in air for complete immobilization of your lower body (fig-21).
Cross your hands over your head behind your back to increase load (fig-22).
Exhale while going up and inhale while coming down.

Variation
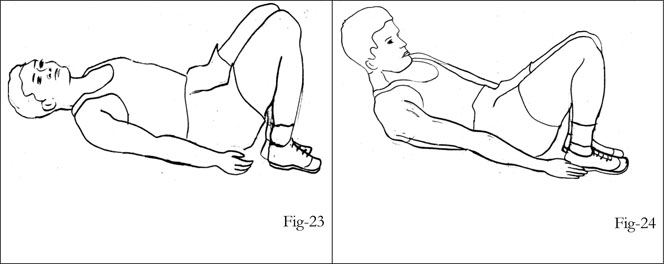
Lie on your back. Keep your hands straight on the ground, palm down, close to your body (fig-23).
Slide your palms 4-5 inches forward on the ground (fig-24) and come back to the original position.
4. LOWER ABDOMINAL CRUNCHES
Areas worked – lower abdominals
Technique
Lie on your back. Fold your legs so that your feet are close to you (fig-23).
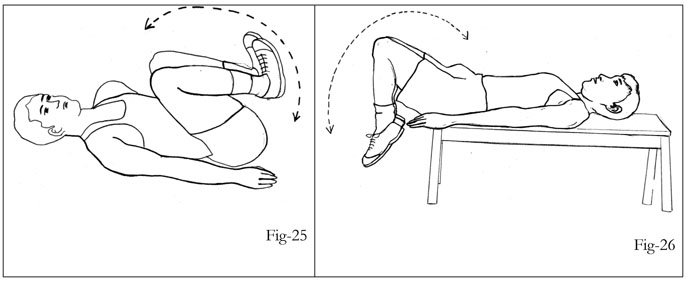
Lift knees towards chest and slowly lower down to the original position (fig-25). (This is 01 repetition).
Do required number of repetitions.
Don’ts
Don’t place your feet away from the hips. Greater the distance of feet from hips, greater will be the stress on lower back.
Never hold your breath during movement.
Hints and Tips
For greater range of movement this exercise can be performed by placing hips on the edge of a bench or bed (fig-26).
Range of movement should be limited so that it does not hurt your lower back.
Variation
(a) Hang from a chin-up bar and lift the knees towards chest (fig-27) and then lower down to original position.
(b) Cycling: Lie on your back. Raise your knees and keep your legs in air parallel to the ground (fig-28).
Pull left knee towards chest and simultaneously straighten the right leg forward (fig-29).
Go back to the original position (fig-28). Perform similar movement by alternating legs.
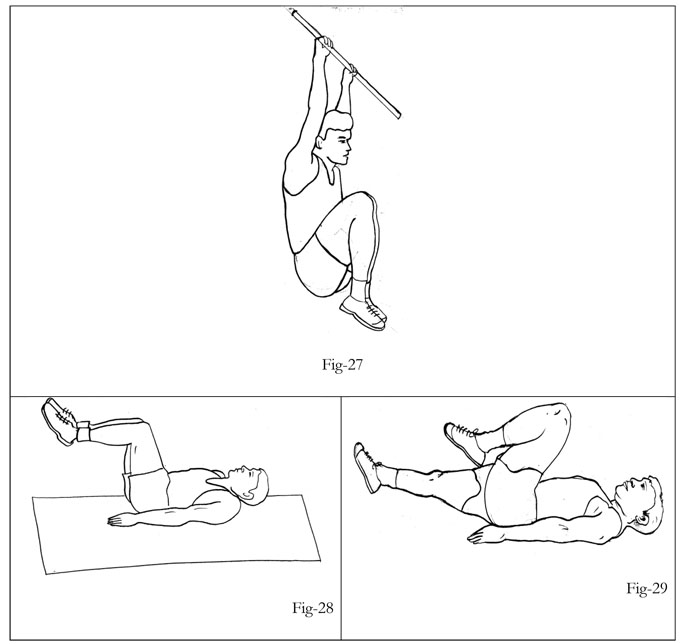
(c) Obliques crunches are good exercise for strengthening obliques.
Technique
Lie on your right side keeping your body straight (fig-30).
Curl your torso 5-6 inches above the ground. You can take support of your right elbow towards the end of movement (fig-31).
Slowly come down to the original position. (This is 01 repetition)
Perform similar movement while lying on your left side.
Keep your alignment straight throughout.
Don’ts
Don’t take too much support from elbow. Try to minimize it. Let your obliques take the maximum load.
Hints and Tips
Cross your hands over your head behind your back for increasing load (fig-32).
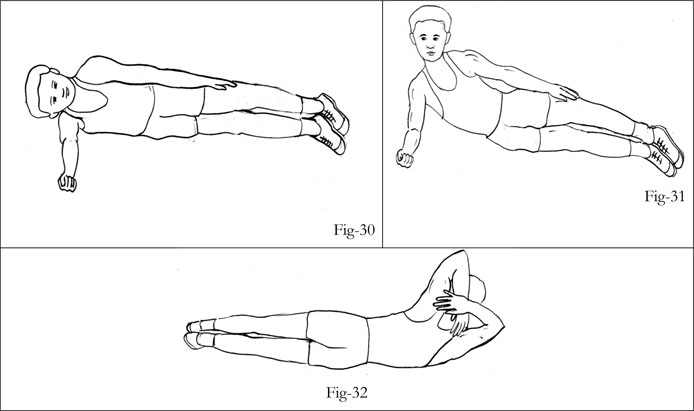
5. PULL-UPS (overgrip)
Areas worked – Latissimus dorsi (Lats) and biceps
Technique
Hold the chin-up bar overgrip with hands slightly wider than shoulder width (fig-33).
Slowly pull your body up so that your chin is above the bar (Peak) (fig-34).
Slowly go down to the original position (fig-33). (This is 01 repetition)
Do required number of repetitions.

Don’ts
Don’t make any jerky movement. Body should be straight in air throughout the movement.
Hints and Tips
In case you find it difficult to pull your body up, take assistance from your partner.
Bigger the width between two hands, greater will be the difficulty level.
Variation
Single hand pull-ups.
6. CHIN-UPS (undergrip)
Areas worked - Biceps, Lats
Technique
Hold the chin-up bar undergrip with hands shoulder width apart (Fig-35).
Pull your body up so that your chin is above the bar (Peak) (fig-36).
Slowly go down to the original position (fig-35). (This is 01 repetition)
Do required number of repetitions.
Don’ts
Don’t make any jerky movement. Body should be straight in air throughout the movement.
Hints and Tips:
In case you find it difficult to pull your body up, take assistance from your partner.
Variation
Single hand chin-ups.
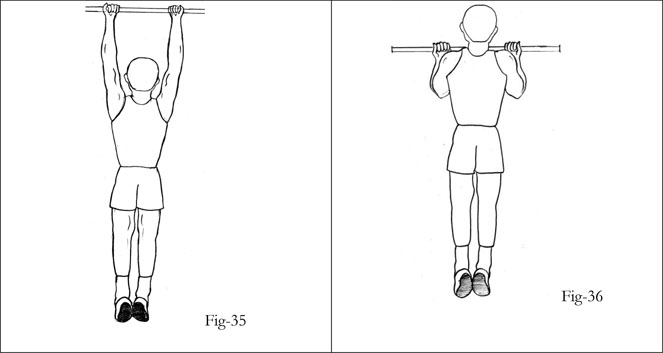
7. DIPS
Areas worked: Triceps, anterior deltoids
Technique
Assume position as in fig-37. Hands close to your sides. Back straight. Feet planted on floor.
Lower down your body till upper arms are parallel to ground.(fig-38)
Go back to the original position (fig-37). (This is 01 repetition)
Do required number of repetitions.
Don’ts
Don’t arch your back throughout the movement. Back should be straight throughout.
Don’t go ‘away’ from the edge of bed/bench. Be close to it throughout.
Don’t try to ‘push’ the ground with your feet to lift yourself up. This will rob the target muscles of their workout benefits. Use the strength of arms for the movement.
Don’t use a furniture that would not be stable during the exercise.
Hints and Tips
Dips can be done on any stable furniture like bed, chair or high steps. Take care that it is stable and strong enough to take your load.
Variation
This can be done by placing your legs on a chair/stool.
For further difficulty level, weights can be placed in your ‘lap’.(fig-39)
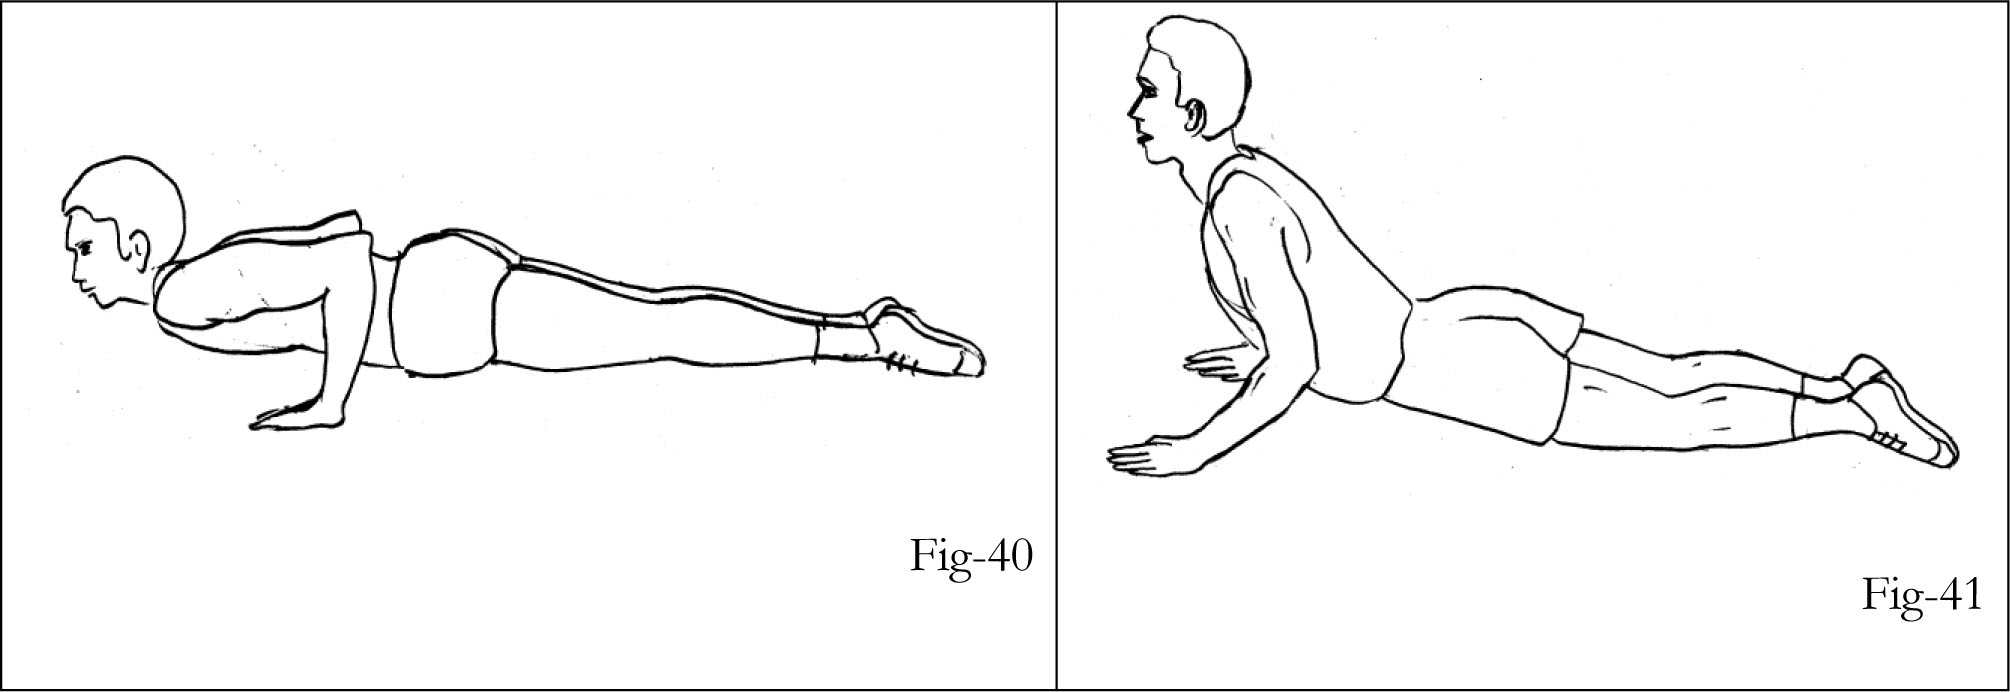
8. BACK EXTENSION
A strong and supple lower back is very important for us. If one does not have enough time to perform all exercises, I would recommend him to do at least those exercises which relate to lower back and abdominals.
Technique
Lie on your abdomen. Keep your hands close to your body (fig-40).
Raise your torso(Peak) (fig-41).
Go down slowly to the original position (fig-40). (This is 01 repetition)
Do required number of repetitions.
Don’ts
Don’t make any jerky movement. It should be slow and rhythmic.
Don’t hold breath at any point of time.
Don’t raise torso so much that belly loses its touch with ground.
Hints and Tips
Take minimum support of your hands to raise your torso. It will be better if you do not take any support of hands at all.
Exhale when you go down, inhale when you go up.
To increase the load perform exercise with your hands folded across your back (fig- 42).

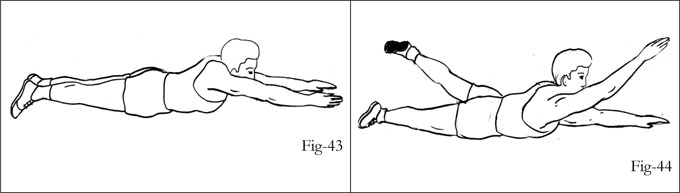
Variation
Superman raise
This variation puts slightly less stress on lower back at a time. Beginners may find it more convenient.
Technique
Lie on ground as shown in fig-43.
Raise right hand and simultaneously the left leg 10-12" above the ground keeping a slight bend in the knees and elbows (fig-44).
Go down to the original position (fig-43). (This is 01 repetition)
Do 10-15 repetitions.
Repeat similar movement with left hand and right leg.
Don’ts
Don’t make any jerky movements.
Don’t raise hips.
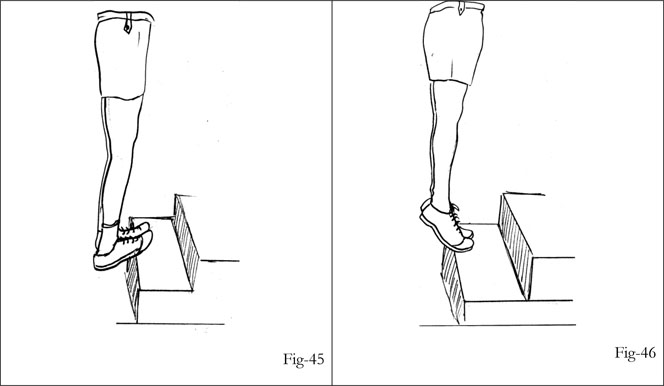
9. CALF RAISE
Areas worked: Calves, ankles
Calves are often called ‘second heart’. They should never be ignored. Well formed strong calves add to strength, speed and beauty of our legs.
Technique
Hold a fixed object like railing or column and stand on the edge of a step on toes with knees slightly bent (fig-45).
Raise your heels to the maximum point so that you stand on your toe (fig-46).
Slowly lower down your heels to the original position. (fig-45). (This is 01 repetition)
Do required number of repetitions.
Don’ts
Don’t keep your knees stiff while going down.
Don’t stop before full range of movement. It may rob calves of full benefits of exercise.
Hints and Tips
Ask your partner to apply pressure on your shoulder to increase resistance throughout the movement.
Variation
As you advance, do it on single leg (fig-47, 48)

Back to top >
Medical disclaimer - The website content is provided for general educational purpose only. It does not substitute professional medical advice. Reader is advised to consult his doctor before starting any fitness program to avoid any health risks.